Written by Cynthia King, M.D., MPH
November 5, 2013

I am always searching for healthy snacks for my kids. That elusive food easy to take on the road, truly healthy, and which they BOTH love — and doesn’t take an hour to make.
In my search for this recipe I’ve stumbled upon Rejuvenator Bars, which I adore, and my 4 year old son gobbles up. It is a great snack (especially pre- and post-work out) that it has spoiled me for all commercially made bars.
I discovered it on the blog of my friend, Rachel Snow. She blogs about food, social justice, and following love to New York at http://foodrefuge.blogspot.com/. When I first looked at the recipe I was worried about the number of ingredients that I don’t normally stock, and therefore may not use in any other recipe BUT it was so healthy and referred by a friend, so I decided to try it.
I’ve come to realize that it doesn’t matter that I don’t use some of the ingredients in any other recipe, because I make this one so regularly that my ingredients never spoil! One of the great things about this recipe is that it can be modified – change the fruits, change the nut butter — as long as you maintain the ratios it will turn out fine. The only disclaimer is that I can not get it to hold its shape at room temperature (if you figure out how to do it let me know!).
I am posting my version, you can see the original on Rachel’s blog.
DRY:
2 cups raw rolled oats
1 cup raw millet
1 cup unsweetened shredded coconut
1/2 cup sunflower seeds
1/2 almond slivers
1/2 cup pepitas (raw pumpkin seeds)
1/4 cup raisins
1/4 cup goji berries
2 Tablespoons cocoa nibs (I buy the chocolate covered ones, as they come in a smaller bag)
1 Tablespoon ground flax seeds
1/2 teaspoon sea salt
Mix together in a large bowl
WET:
1 cup almond butter
1/4 cup coconut oil
1/2 cup honey
Measure wet ingredients together in a large pyrex measuring cup and pop it in the microwave for 30 seconds or so. Stir to mix thoroughly.
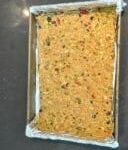
Add the wet to the dry and stir to mix. Turn into a 9×12 inch pan lined with foil (I like metal pan so I don’t have to worry about breaking it in the next step). Spread out and press into an even layer. Then beat the bejeezus out of it! I use the bottom of a metal 1 cup dry measure for this step. It is kind of fun and therapeutic (plus my four year old gets into it!). This step help them to stay together-the more you beat them the better they will hold up.
Refrigerate and enjoy! You can cut them one at a time or cut them all at once. They stay good in the refrigerator for over a week.


